Tech Tips — Hot hide glue and making your own glue pot
The advantages of hot hide glue in piano work:
•
Reversibility: Hot hide glue is very water-soluble, simplifying future repairs
•
Controllable penetration: Hot hide glue gels quickly, so it won't penetrate too far into porous
materials like felt and harden it excessively. Actually, hot hide glue has a two stage curing
process. First, it turns from a liquid to a gelatin as soon as it cools slightly. Then over a longer
period of time, it turns hard and rigid as the water content leaves the glue.
•
Sizing properties: Hot hide glue contains water, and this moisture causes bushing cloth to conform
to shape when pressed into key mortises, flange bushings, etc. It also swells knurled hammer
shanks for a tight fit in hammer bore holes. When the glue later turns hard, the parts are locked
into the desired shape. Thus, precision key bushing cauls and hot hide glue yield bushings that
require little or no easing.
•
Adjustable gelling time: The time between application of the liquid glue and when it gels can be
adjusted by the addition of urea, a dry granular substance available from fertilizer stores or from
Pianotek Supply Co. (800-347-3854). This allows you to tailor the working properties to the
specific job and environment. For instance, if the work area is cold, the glue may begin to gel
before you've assembled the parts, bushing cloth, etc. And when hanging hammers, you may want
to add urea to allow more time for alignment before the hammers lock onto the shank.
•
High strength: Hot hide glue makes wood joints stronger than the wood itself, and because it
dries rigid it will not creep under load.
•
Indefinite shelf life of dried glue: As long as they are kept dry, dried glue crystals will last
virtually forever, unlike liquid glues which deteriorate badly with age.
•
Simple to mix and use: With the right glue pot, hot hide glue is a pleasure to use. With the wrong
setup, it can be a nuisance.
Make the world's best hot hide glue pot for
under $20.00
Many technicians have tried hot hide glue with poor
results. I believe this is entirely due to using the wrong
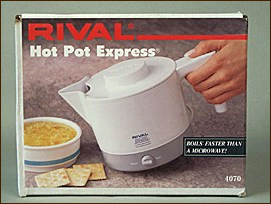
glue pot setup. The Rival Hot Pot Express (box pictured
here) has several advantages over the expensive
commercial models, and when used as described here it
will make hot hide glue a joy to work with. You can buy
this item at many discount stores for under $20.
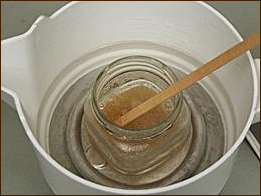
The first secret of using hot hide glue is to mix the glue in
a small container, then place this into the glue pot and
surround it with a water bath. Choose a container
proportional to the amount of glue needed so the glue mix
is about 3/8" to 1/2" deep.
To prepare glue for key rebushing, add glue crystals about
3/8" deep in a small jar or can, then add water into the
glue container until it just covers the glue. Then add water
to the pot outside the glue jar, equal in depth to the glue
level.
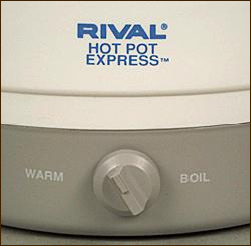
One advantage of this pot is its temperature control shown
here. Hot hide glue should be kept at 145 to 150 degrees F. It
needs to be hot enough to be well dissolved but not so hot
that it breaks down. Overheating or holding at high
temperature for a long time gradually deteriorates the glue.
The first time you use your pot, place a cooking
thermometer in the glue mix and adjust the control knob for
145 degrees. Then mark the pot so you know where to set
the dial in the future.
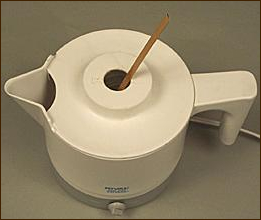
The most important requirement for a hot hide glue pot is
that it have a lid in place at all times when dissolving and
using the glue. This contains a steamy moist air over the
glue surface, preventing it from skinning over and
maintaining a constant consistency. As shown here, just use
a hole saw to drill a 1" hole in the top of the pot. Each time
you withdraw the stick or brush, you can wipe excess glue
on the side of the hole and it drips right back into the glue
container.
Remember that hide glue gels as it cools, so without a lid
the top surface of the glue cools and loses moisture,
forming a skin unless constantly stirred. Do not even try to
use any glue pot without using this water bath/ lid system
or you will become discouraged.
Stir the glue occasionally as it dissolves. It should be
ready to use after about 10 minutes. Check the
consistency. If too thin, add more glue crystals and wait
for it to dissolve. If too thick, simply pour a little of the
heated water into the glue container.
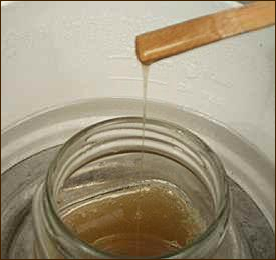
For key rebushing, the glue should be about the
consistency of heavy cream as shown at right. For
hammer hanging, it should be slightly thicker to avoid
dripping.
As you begin to use the glue, pay careful attention to the
gelling time. If it gels before you have a chance to
assemble the parts, add urea ( a nitrogen fertilizer found
at garden stores). Use 1/2 tsp. per Tbs. of dry glue
crystals or more as needed. This is especially helpful in
cold shop conditions, or whenever you have a slower
assembly time.
Additional tips:
•
Glue strength gradually declines with extended heating or repeated cooling and reheating. You
can successfully reheat hide glue several times for non-critical work like gluing on dampers, back
rail cloth, etc. (store covered in the refrigerator between uses). However, for high strength uses
like wood working or hammer hanging, always mix it fresh.
•
Common lore is to mix the glue crystals with cold water only, then let it sit overnight before
heating. I believe this is unnecessary and have always mixed and heated immediately with
excellent results.
•
Hide glue crystals and urea are available from Pianotek Supply Co. 800-347-3854