Tech Tips — Key rebushing using the two caul method
This method allows installation of new bushings in both rails in 1 1/2 hours or less, with excellent
quality and little or no key easing needed. The secret is in the economy of motion and tool usage due
to handling only one piece of cloth at a time. An Intermediate Caul temporarily holds the first piece
of cloth in place, then a Final Caul is used to clamp the second piece.
By using bushing cauls accurately made to correspond to the size of the key pins, a quality bushing
cloth, and hot hide glue, the bushings are molded into the correct shape and size as the glue
hardens. This greatly reduces the need for key easing, thus preserving the keys and yielding a more
stable job.
Step 1 - Measure the key pin sizes of both rails: Never assume a pin size. Always take a micrometer
reading, then choose the appropriate Intermediate and Final cauls from the caul size chart.
Step 2 - Choose a cloth thickness using a dry-fit test:
You will need a selection of cloth thicknesses on hand for
all bushing jobs. Loop a piece of bushing cloth into the
mortise, then test the fit of the correct Final Caul. It
should be snug but not tight: snug enough that you can
lift the key up by holding the caul, but loose enough that
the key falls off with one or two shakes.
Test several mortises for an average. Each rail may
require a different cloth thickness.
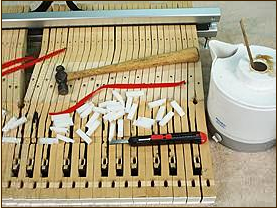
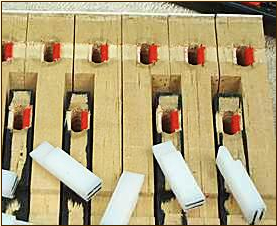
Step 3 - Lay out all tools and materials:
Clamp the keys together as a unit so both your hands are
free. Our aluminum Key Clamps are shown here.
Have your hot hide glue mixed to the right consistency,
and a small flat stick for spreading (Popsicle size). Lay
out the correct Intermediate cauls, several 12" long
pieces of bushing cloth, a small hammer, and a sharp
knife.
A small knife with a sectioned, snap-off blade is ideal for
key bushing. Available at any hardware store, these have
slim comfortable handles and you get a sharp tip just by
breaking off the end blade section.
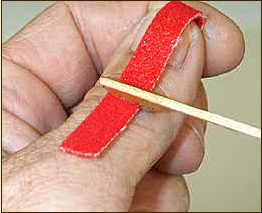
Step 4 - Apply glue to the cloth: Your glue should be 1/2"
deep or less in the container, so that when you withdraw
the stick it holds about the right amount.
Holding the cloth as shown, spread the glue with one or
two strokes, then wipe once with the dry upper part of the
stick to level and remove excess glue.
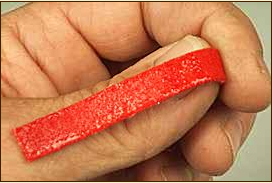
When first learning, apply glue to only about 1" of cloth.
After a little practice you should be able to work with 1-
1/2" to 2" of glued cloth.
You should have a thin but complete coating of glue, with
no dry spots or globs.
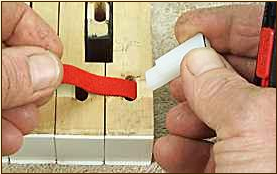
Step 5 - Position the cloth on the key:
Holding the knife in the palm of your hand, pick up an
Intermediate caul with that same hand. Lay the cloth
across the mortise with the end just touching the far side
of the mortise. This positioning assures proper depth of
cloth in the mortise. 3/16" is ideal.
The knuckles of the cloth hand should be resting on the
keys, making exact positioning simply a matter of rocking
the hand slightly right or left.
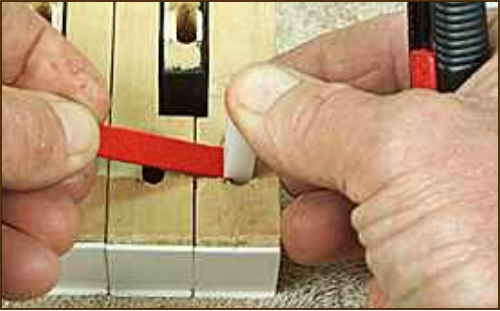
Step 6 - Insert the Intermediate Caul:
Hold slight tension on the cloth to avoid drawing more
into the mortise, and insert the caul.
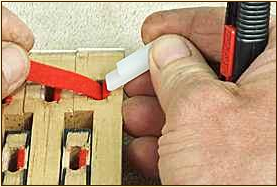
Step 7 - Trim the cloth:
Still holding slight tension on the cloth, trim it flush to
the caul.
Note the advantage of a knife that you can hold in the
palm of your hand while still picking up and inserting
cauls. Razor blades have to be held in the finger tips,
and thus have to be picked up and set down continually.
Step 8 - Proceed to the next key:
Without setting down the knife, move to the next key
and immediately repeat the process of positioning the
cloth, inserting the Intermediate caul, and trimming.
Because you continually hold the cloth in one hand and
the knife in the other, time spent picking up and setting
down tools is minimized. And by working with only one
piece of cloth and using the mortise width as a depth
gauge, speed and consistency are automatic.
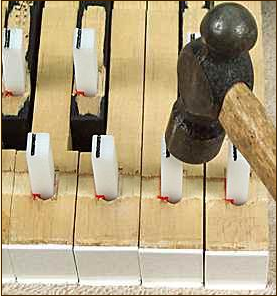
Every 5 or 6 keys, set down the knife, tap the cauls
lightly to seat them, reapply glue to the cloth, and
proceed.
Note: You can economize and get by with only 45
Intermediate cauls if desired. Once you've done the first
45 keys, immediately pull out the first 20 Intermediate
cauls, bush keys 46 - 66, pull out another 22, and bush 67
through 88. Since you will be inserting the second piece
of cloth and the Final cauls soon, the Intermediates are
only needed temporarily. However, if you do much
rebushing you will find it faster and more convenient to
have 90 Intermediates so you can work down the rail
without interruption.
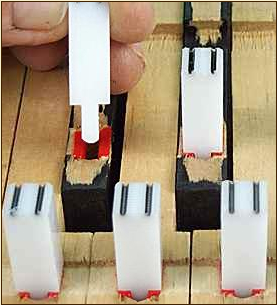
Step 9 - Install the Final Cauls:
Most people find it easier to work in one direction (e.g.
right to left or left to right). If so, turning the keyboard
around as shown here will let you continue working in
the same direction as you bush the second side of the
mortise.
Since the Final cauls must stay in place for several hours
to size the bushings, you need at least 90 Finals to do
one rail, or 180 Finals to do both rails at one time.
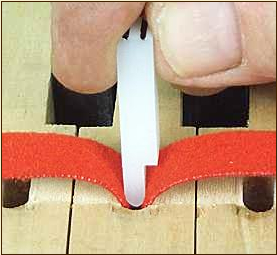
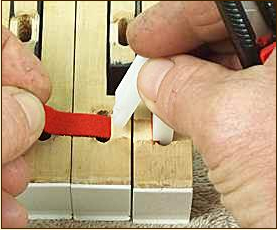
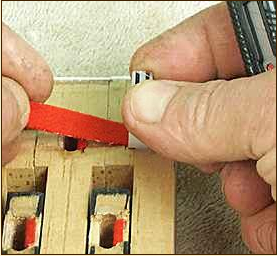
Lay out the Final cauls now, and proceed to bush in the
same manner as before with one exception: since the
mortise opening is now slightly narrower, dip the cloth
down into the mortise slightly, as shown here, rather
than laying it straight across. This will compensate for
the narrower "depth gauge", and will keep the glued side
of the cloth away from the cloth already in place.
Position the cloth, insert each Final Caul, and trim as
before.
Snap off a knife section to expose a fresh tip
periodically; trimming the cloth should be just a simple
quick swipe of the knife.
It's wise to check yourself to ensure correct cloth depth,
especially when learning. Every few keys just insert the
caul, but instead of trimming just wait a few seconds,
withdraw the caul, and look down into the mortise.
Adjust your technique as necessary until you achieve
consistent cloth depth.
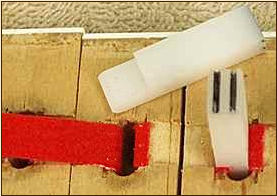
Some prefer to use our Double Shoulder cauls as the
Final caul for front rails. These clamp the bushing
shoulders securely on both sides of the mortise during
the drying period, as added insurance against one side
lifting. However, with proper gluing technique and glue
priming of the mortises before hand, this is not normally
a problem.
On some keys the shoulder recesses are different heights
on each side of the same mortise. In this case, it is
better to use single shoulder cauls so each side can be
clamped independently by the Intermediate and Final
cauls.